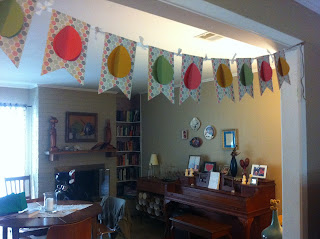
I pulled this straight from Creations by Kara with a few modifications. I really love the way it turned out! You can see Kara's HERE.
Easter Egg Banner
Supplies:
- Free printable pattern- Medium card stock for banner shapes
- 1 piece of medium scrap card stock for pattern template
- Scraps of colored paper for egg shapes (I used light card stock)
- Hot glue gun
- Scissors
- Pencil
- Fabric pieces, twine or yarn
* I went to Hobby Lobby - they have the best paper products in their scrapbook making section and so affordable!
Instructions:
1. Print out your pattern2. Cut out the banner (with egg shape still in the middle) and trace it onto the piece of scrap card stock in order to make your template. Be sure to extend the top of the banner 1" or so when making your template. You are going to want to fold that part over your twine.
3. Cut out the egg shape and trace that onto the scrap card stock as well
4. Cut both shapes out - now you have your templates!
 | |
6. Fold the tops of your banner pieces down and make a crease.
7. Trace double the amount of egg pieces on the colored paper - in my case I made 20 eggs.
8. Fold 10 of the eggs in half length-wise.
9. Hot glue gun all 10 FLAT eggs in the middle of the banners.
10. Take the folded eggs and run a light glue line along the crease and press firmly in the middle of the flat egg.
11. At this point you can measure and cut your twine or yarn and hot glue the banner flaps around it. Try not to glue the twine to the banner if you want some movement.
Alternately you can use fabric pieces like I did to create the cute little knots between each piece.
1. Cut your scrap fabric into 1" width strips
2. Cut your strips down to around 10" pieces
3. Fold the top of banner over the fabric and glue in place. Try not to glue the fabric to the banner. I like to have some movement to play with.
4. Tie each piece together.
5. Tie your end pieces to twine or yarn like I did OR you can make your end fabric pieces longer.
Tie your cute banner inside or out and enjoy all season!


I love how your version turned out Rachel! I am jealous of the green grass in your photo. We got snow today. :(
ReplyDeleteIt'll be brown in no time :/. Thanks again for your craft inspiration!
ReplyDelete