Monday, March 25, 2013

Banners - No Sewing Required!

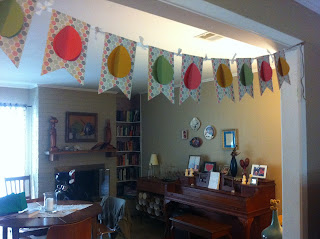
I am banner crazy these days...must be this AMAZING Austin weather!  Banners are a great way to get rid of leftover fabric pieces, add some sunshine to a space and release your creative energy!  AND...they are supah dupah easy!

What you'll need: 

- leftover fabric
- fabric scissors
- hot glue gun
- twine or string

1. Create a banner template (mine are 5" across, 8" top to point)
2. Trace around the template on your fabric pieces
3. Cut out and arrange the way you want them
4. Flop the top over the twine and glue down (be sure not to glue your twine if you want movement)

Voila!  Adorable every time!

If you're feeling extra lazy and don't want to create a template, just cut out rectangular pieces of fabric and hang them the same way.  I tried both and I think I like the rectangular strand better.  The piece sizes don't match but it looks perfect that way!  Have fun! 


Thursday, March 21, 2013

3-D Easter Egg Banner

Today is the 1st day of spring!  And with that said, we all know Easter's around the corner.  Brad and I will be in Big Bend this year for the holiday, so there will be no dying or hunting of eggs.  So I thought I'd do my part in decorating and acknowledging with this adorable, easy to make Easter banner. And!  It cost me under $10!  This would be a great kid's craft too if you wanted to replace the hot glue gun with a glue stick.


I pulled this straight from Creations by Kara with a few modifications.  I really love the way it turned out!  You can see Kara's HERE.


Easter Egg Banner

Supplies:

- Free printable pattern
- Medium card stock for banner shapes
- 1 piece of medium scrap card stock for pattern template
- Scraps of colored paper for egg shapes  (I used light card stock)
- Hot glue gun
- Scissors
- Pencil
- Fabric pieces, twine or yarn
* I went to Hobby Lobby - they have the best paper products in their scrapbook making section and so affordable!


Instructions: 

1. Print out your pattern
2. Cut out the banner (with egg shape still in the middle) and trace it onto the piece of scrap card stock in order to make your template.  Be sure to extend the top of the banner 1" or so when making your template.  You are going to want to fold that part over your twine.  

3. Cut out the egg shape and trace that onto the scrap card stock as well
4. Cut both shapes out - now you have your templates!


5. Trace however many banner pieces you want and cut them out - I made 10.
6. Fold the tops of your banner pieces down and make a crease.


7. Trace double the amount of egg pieces on the colored paper - in my case I made 20 eggs.


8. Fold 10 of the eggs in half length-wise.


9. Hot glue gun all 10 FLAT eggs in the middle of the banners.
10. Take the folded eggs and run a light glue line along the crease and press firmly in the middle of the flat egg.


11. At this point you can measure and cut your twine or yarn and hot glue the banner flaps around it. Try not to glue the twine to the banner if you want some movement. 

Alternately you can use fabric pieces like I did to create the cute little knots between each piece.


1. Cut your scrap fabric into 1" width strips
2. Cut your strips down to around 10" pieces
3. Fold the top of banner over the fabric and glue in place.  Try not to glue the fabric to the banner.  I like to have some movement to play with.
4. Tie each piece together.
5. Tie your end pieces to twine or yarn like I did OR you can make your end fabric pieces longer.


Tie your cute banner inside or out and enjoy all season!


Wednesday, March 6, 2013

Chilled Vegan Chocolate Torte - Raw

I looove a good chocolatey torte.  I used to work at a high-end restaurant that served the most decadent chocolate and raspberry dessert you could ever dream of!  I had my share...believe me.   Would I ever think in a million years that I would enjoy one just as much and...RAW!?   Not so much.  But this little baby changed my mind (and my world) completely. 

Once again, Oh She Glows, knocks it outta the park with this easy recipe:


No Bake Chilled Chocolate Torte 


No Bake Crust: 

 2 cups Pecans
1/4 cup Cocoa Powder
2 tbsp Coconut Oil
1/4 cup Pure Maple Syrup
1 tsp Pure Vanilla Extract
1/2 tsp Kosher Salt

Chocolate Avocado Mousse: 

 2 cups Avocado Flesh (roughly 3 small avocados) pitted and scooped out
1/3 cup Almond Milk (or other non-dairy milk)
2/3 cup Pure Maple Syrup
1 tbsp Smooth Peanut Butter (or other nut or sunflower seed butter)
1 tbsp Arrowroot Powder
1/4 tsp Kosher Salt
1 tsp Pure Vanilla Extract
1 cup + 2 tbsp Vegan Chocolate Chips, melted
1/4 cup Cocoa Powder, sifted if clumpy


Directions:

1. Crust: *Oil a 7-10 inch springform pan and line it with a circle of parchment paper. In a food processor, pulse the pecans until crumbly. Be careful not to over process them as you still want them a bit chunky. Now add in the rest of the crust ingredients and pulse until just mixed. Scoop mixture onto prepared pan and press down firmly and evenly with slightly wet fingers or a spatula. Pop into freezer to set while making the mousse.

2. Chocolate mousse: Place all mousse ingredients (except chocolate chips) into food processor. Process until smooth. In a small bowl, melt your chocolate chips in the microwave and scoop melted chocolate into food processor mixture. Process until smooth.

3. Remove crust from freezer and scoop this mousse on top of crust. Smooth out as much as possible and then place in the freezer for 2 hours to firm.

4. Once firm, remove from freezer and allow to sit on the counter for about 5-10 minutes before serving chilled. Add fruit or other toppings while allowing to sit.  **Place leftover torte in the freezer wrapped and placed in a seal container.

Note that this torte should be served chilled as it gets soft at room temperature.

*I didn't have a springform pan on hand, so I just lightly oiled a pie dish.  It came out perfectly.  
**I put leftovers in the fridge...it was softer, of course, but I enjoyed the texture more.  


Sunday, March 3, 2013

Easy, Yummy Marinade

It's still TECHNICALLY winter...but in Austin, TX you can easily get to grillin' when it's 65 degrees and sunny out!  And that's exactly what we did yesterday. 

As a veg-head...the term "grilling out" scares most...but not me :)  With a bunch of veggies and herbs in stock, you won't feel left out...promise!

Here's what you'll need:

That's EVOO, Balsamic Vinegar, minced Onion & Garlic, Basil, S&P

 I chopped everything in my AMAZING Cuisinart SmartStick Immersion Hand Blender...sooo easy!

Fresh Basil

Instuctions:  

1. Mix all ingredients
2. Use your hands or brush and cover your veggies
3. Grill on grill pan or wrapped in foil
4. Enjoy!
 
Meaty Portabellos!


*You can also use this marinade to saute or bake your veggies.