Wednesday, August 21, 2013

Lu's Tomato Gravy

We call it Gravy in the boot, y'all ;)  I'm so far removed from my Italian/Jersey roots growing up in Texas.  But you can take this girl to the ends of the Earth but I will never be too far removed from the food of my ancestors!

All too often a simple pasta dish is made when I'm feeling lazy.  Throw my noodles in a pot and crack open a bottle of pasta sauce and dinner is served!  Bottled sauce is convenient but nothing compares to homemade chunky gravy!  If my mom or Granny Angie (rest in peace) knew how much money I spent on sauce they'd whack me upside the head!

I was home a couple of weeks ago visiting my folks.  I asked my mom about her meatballs which, in turn, led me to asking about her sauce.  I remember it being so rich and simmering on the stove top for hours as a kid.  But in reality, it's a quick and simple process!

Here's what you'll need:

Stock Pot
Wooden Spoon - you can't make gravy without a wooden spoon ;)
1/4 cup Shallots
1 Tbsp Garlic
1/4 cup Olive Oil
2 28 ounce cans Whole Tomatoes
1 tsp Oregano
*2 Tbsp Salt
1 pinch Pepper
1 pinch Crushed Red Pepper

*2 Tbsp is a lot of salt.  I think 1 is plenty - even 1/2 would work.

Directions:

1. Adjust heat to Medium - add shallots and garlic to olive oil for 6-8 minutes or until translucent


2. Add the rest of the ingredients - raise heat and cook for 30 minutes, stirring and breaking up the tomatoes every so often

3. Lower heat and simmer for another 30-45 minutes stirring every so often

And that's it!  This sauce can be stored in an air-tight container in the freezer for up to 3 months.

Again - this recipe is just a base.  You can add all you want and make it your own!  I added portabello, green pepper and eggplant.  Have fun and Mangia!  Mangia!


Wednesday, May 8, 2013

Putting the Qool in Quilt

I'm having so much fun with quilting!  My mother-in-law is a pro and her pieces were always so mind-bending!  I didn't realize that simple quilting was an option.  There are so many facets to this craft...it's huge...and yes...mind-bending!

I started making basic blankets and painting stencils on them.  I love doing this but with summer coming up, I wanted to make a thinner blanket and practice more of my sewing.


So...that's when I started looking around at basic quilting and thought, "I can do that!"

I'm starting off with simple straight-line and free-line projects here: 


I just received a new shipment of fabrics from Fabric Worm!  I think I'm going to try piecing smaller pieces this time aroundStay tuned for more!  Visit my etsy shop for projects and prices: www.etsy.com/shop/samartiepants

ciao!

Monday, April 15, 2013

Toddy Iced Coffee at Home - The Coffee Sock Co.

Monday Morning Coffee Talk:

It's Toddy season people!  It's warming up and I only want cold brewed coffee from here on out!  Toddy is a trademarked cold brewing system but is synonymous with any sort of cold brewed coffee.  No longer do we just throw ice cubes in our otherwise warm coffee!  Grodie!  Who wants watered down coffee!?  Cold brewing refers to steeping your grinds in room temp or cold water for an extended period of time.  This process of slowly extracting flavor from the beans produces a different chemical profile than conventional brewing methods.  The result seems a bit sweeter due to lower acidity and much more concentrated.  This brew will definitely kick you into high gear!  Last year around the holidays I was gifted this amazing Toddy maker by Corina Guillory of The Coffee Sock Co.  I'm so excited to finally use it! 


I've known Corina for many moons, she being a long time customer of the market I used to run.  Her company makes reusable, organic cotton coffee filters, tea bags and cold pressed coffee kits...genius!  She hand sews all of the bags!


Toddy Filter


HERE is a list of her products.  Corina is incredibly sweet and crafty and I am so proud of her!  You can purchase her products or find out where to buy them HERE.

So...now we know what Toddy is but how do we brew it!?  It's easy folks.  The Coffee Sock Co. Cold Brewer comes with simple instructions to help you out.


Here's what you do:

1.  Grind your beans COARSE.  Muy importante.  Like so: 


2.  Keep your Coffee Sock folded over your jar and fill with the grinds.  Corina suggests 2 cups of grinds per 7 cups of liquid.  So fill that bad boy with roughly 2 cups grinds.

3.  Pour water over grinds to make them bloom.  Simply wet (not soak) them for about a minute.  You will see the grinds rise and break apart a bit...like a muffin rising. 

4.  Add 7 cups of cold water to your grinds.  You will see the water seeping out like so:


5.  Tie up your Sock.  I wrapped the string around LOOSELY and then placed the ring around it.  You don't want to wrap the Sock too tightly.


6.  Place in fridge for roughly 12 hours.


7.  Pull out sock and enjoy!  


 These Socks are reusable.  Just rinse out, dry and use over and over again!


Sunday, April 7, 2013

Big Bend Vacation!

Mo Chillaxin'
Rosie Chillaxin'


West Texas,

We Heart You!


We packed up the dogs and headed out West!

As a life-long Texan, I've never been to Big Bend!!  Can you believe!?  Well that's all changed now, ya' see.  I'm a desert gypsy, a rock collector, a star gazer!  I AM a West Texas Wild Child!

We started our week off in the hip, artsy town of Marfa.  Dusty roads and tumbleweed the size of beach balls.  It's a 1-light town.  We stayed in one of Liz Lambert's renovated hotels, The Thunderbird.  It was actually a little run down...needs a bit of upkeep.  The pool was green :/  BUT...they had record players, vinyl and cruisers to rent....so that made up for the pool. 


We rode around town lovin' the isolation and the freedom!  We ran into the same 10 people...a couple of which I recognized from Austin of course!  It feels like it could be a sweet, cozy town...but I didn't get a lot of warmth from the people there.  Just sayin'.


So Rude!  ;)
Brad & Rosie waiting for bfast tacos!

 **If you are going to bring your pups, be aware that there aren't too many green spaces in Marfa AND the green spaces they do have, are loaded with stickers.  Ouch!

Places I recommend:

1. Moonlight Gemstones - cool, little rock shop loaded with rocks, gemstones and fossils
2. Pizza Foundation - old, converted full service gas station now serving wood fired pizzas.  yum!
3. Maiya's - Italian food - right in the heart of it all.  Amazing space and great staff.

4. Marfa Book Company - really cool book shop - specializing in all the goods - art space connected to it
5. The Get Go - natural food store
6. Frama - the coffee shop in Marfa - adjacent to Tumbleweed Laundry
7. Future Shark - from the owners of Food Shark trailer that wasn't opened when we were there :(  This is an actual restaurant space.  It's cafeteria style but super yummy and great wine selection

Ok...that's almost every place in Marfa.  Ha!  Have fun!

McDonald Observatory
A MUST SEE if you are heading west is the McDonald Observatory.  Check their website to attend a Star Party.  I think tickets are $25/pop...but all goes back to the Observatory and it's so worth it.  The party starts at around 8:45pm.  You and a couple 100 other people sit outside in a circle and listen to the director of the program talk a bit about what you can expect to see that evening.  He had this AMAZING green laser pointer that he then used to point out all the goods!  I now know how to find the North Star, that you can see Jupiter at this very instant and where to find the galaxies M81 & M82!  After about 45 minutes of oohing and aahing, he lead us to the telescopes.  The lines were long but again...so worth it.  This is a perfect excursion for the kiddos!

Star Gazers
Onward & upward...we head down to Big Bend!  Our destination is the Lajitas Golf Resort in Lajitas, TX.  Lajitas is smack dab in the middle of Big Bend State Park and Big B
end National Park.  We made our way south and then east through Presidio, TX.  The drive is amazing!!  You drive right along the Rio Grande.  Although mostly bare...the mountain drive was beautiful!  Something like the picture below but there were no clouds and hardly any water.


Big Bend
 It is hot down here in the spring!  97 degrees I think it got up to!  But it's that yummy dry heat...AND the pool at the resort was super cold.  I have nothing but amazing things to say about
Lajitas Golf Resort and Spa.  It wasn't overly posh (no room service!) but it was very nice.  Golf, spa, horseback riding, ghost town tours, gun shooting, hiking, biking, canoe trips, kayaking....they have it all!  We just wanted to relax mostly so we hiked a bit and mainly sun bathed and read by the pool. 


Lajitas Resort Pool - Big Bend
The resort's restaurant is delicious and the bar there is super low key and comfortable.  The resort also has a few small shops on the property.  I loved the store Christina's World.  Chris has all sorts of little treasures...including an amazing jewelry selection, some of which her and her partner create!  \

I fell in love twice while in West Texas.  My first love is the Ochitillo Plant.  They were in full bloom.  They reach up to the sky with their spiky, green stems and full, juicy, red blooms.  Absolutely stunning!  And...they're everywhere!


My second love I found out west was here all along!  Ms. Patti Smith.  I picked this lil' gem up at the bookstore in Marfa.  She has lived a fascinating life...always at the right place at the right time.  I'm not a huge fan of her music but her poetic sense is spell binding and so is this book!  I look forward to getting to know more of her work.

 
 An absolute must down in these parts is the kooky little town of Terlingua.  Be sure to grab a beer at the cavernous La Kiva and a bite at Starlight Theatre.  Take in the night on the benches in front of the Theater.  Characters a plenty!  Great people watchin'! 


Get Me Home!
 Loooong 8 hour trip home.  Pups were glad to be back! 


Wednesday, April 3, 2013

Vegan White Russian Recipe

My blog is getting quite the buzz over in Russia this week.  So to celebrate with my new friends...I give you the Vegan White Russian!  Mmm-mmm good!


You will need:

1 shot Coffee Liquor (go HERE for a home made vegan version!)
1 shot Vodka (my fave is Monopolova)
Splash of Coconut Milk Creamer
Splash of Light or Unsweetened Soy Milk

Mix it up and enjoy on the rocks!

Naslazhdaites'!
(enjoy!)


Monday, March 25, 2013

Banners - No Sewing Required!

I am banner crazy these days...must be this AMAZING Austin weather!  Banners are a great way to get rid of leftover fabric pieces, add some sunshine to a space and release your creative energy!  AND...they are supah dupah easy!

What you'll need: 

- leftover fabric
- fabric scissors
- hot glue gun
- twine or string

1. Create a banner template (mine are 5" across, 8" top to point)
2. Trace around the template on your fabric pieces
3. Cut out and arrange the way you want them
4. Flop the top over the twine and glue down (be sure not to glue your twine if you want movement)

Voila!  Adorable every time!

If you're feeling extra lazy and don't want to create a template, just cut out rectangular pieces of fabric and hang them the same way.  I tried both and I think I like the rectangular strand better.  The piece sizes don't match but it looks perfect that way!  Have fun! 


Thursday, March 21, 2013

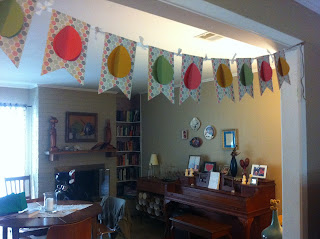
3-D Easter Egg Banner

Today is the 1st day of spring!  And with that said, we all know Easter's around the corner.  Brad and I will be in Big Bend this year for the holiday, so there will be no dying or hunting of eggs.  So I thought I'd do my part in decorating and acknowledging with this adorable, easy to make Easter banner. And!  It cost me under $10!  This would be a great kid's craft too if you wanted to replace the hot glue gun with a glue stick.


I pulled this straight from Creations by Kara with a few modifications.  I really love the way it turned out!  You can see Kara's HERE.


Easter Egg Banner

Supplies:

- Free printable pattern
- Medium card stock for banner shapes
- 1 piece of medium scrap card stock for pattern template
- Scraps of colored paper for egg shapes  (I used light card stock)
- Hot glue gun
- Scissors
- Pencil
- Fabric pieces, twine or yarn
* I went to Hobby Lobby - they have the best paper products in their scrapbook making section and so affordable!


Instructions: 

1. Print out your pattern
2. Cut out the banner (with egg shape still in the middle) and trace it onto the piece of scrap card stock in order to make your template.  Be sure to extend the top of the banner 1" or so when making your template.  You are going to want to fold that part over your twine.  

3. Cut out the egg shape and trace that onto the scrap card stock as well
4. Cut both shapes out - now you have your templates!


5. Trace however many banner pieces you want and cut them out - I made 10.
6. Fold the tops of your banner pieces down and make a crease.


7. Trace double the amount of egg pieces on the colored paper - in my case I made 20 eggs.


8. Fold 10 of the eggs in half length-wise.


9. Hot glue gun all 10 FLAT eggs in the middle of the banners.
10. Take the folded eggs and run a light glue line along the crease and press firmly in the middle of the flat egg.


11. At this point you can measure and cut your twine or yarn and hot glue the banner flaps around it. Try not to glue the twine to the banner if you want some movement. 

Alternately you can use fabric pieces like I did to create the cute little knots between each piece.


1. Cut your scrap fabric into 1" width strips
2. Cut your strips down to around 10" pieces
3. Fold the top of banner over the fabric and glue in place.  Try not to glue the fabric to the banner.  I like to have some movement to play with.
4. Tie each piece together.
5. Tie your end pieces to twine or yarn like I did OR you can make your end fabric pieces longer.


Tie your cute banner inside or out and enjoy all season!